RoostGPT
RoostGPT requires the following to operate successfully
- Roost License Token or File
- Gen-AI Provider API Key and API Token
- GitHub API token (with read and write permissions)
- Optional access:
- Jira API token (with read and write permissions)
- Email Server, user and password
- Slack or MsTeams token
- RoostGPT Platform Feature Comparison
- Self Hosted RoostGPT - OnPrem
- Ubuntu Server Requirements
- Download Roost Deployment Tool
- Network Configuration and SSL Certificates
- Launch RoostGPT stack
- Self Hosted RoostGPT - Deploy on AWS using Terraform
- 1. Getting Started
- 2. OAuth Provider Setup
- 3. Database Setup
- 4. Terraform variables
- 5. Upgrading/Maintaining RoostGPT Control-plane
- RoostGPT Command Line Interface (CLI)
- VS Code Extension
- RoostGPT Infrastructure
RoostGPT Platform Feature Comparison
Supported Features Across Deployment Options
| Feature Category | Web Interface (UI) | Command Line Interface (CLI) | IDE Plugin |
|---|---|---|---|
| Workspace Integration | Not Available | ✅ Local workspace trigger supported | ✅ Local workspace trigger supported |
| Version Control Integration | ✅ Full Git activity support via web interface | ✅ Full Git activity support via CLI commands | ❌ Limited to local workspace operations |
| Notifications | ✅ Real-time notifications when test generation completes | ❌ No notification system | ❌ No notification system |
| License Management | ✅ Integrated license validation in UI | ✅ API-based or license file validation | ✅ API-based or license file validation |
| Event Monitoring | ✅ Webhook support for Git events (PR creation, push, etc.) | ❌ No Git event monitoring | ❌ No Git event monitoring |
| User Management | ✅ Role-based access control with separate admin and user views | ⚠️ Individual user basis on local system | ⚠️ Individual user basis on local system |
| Analytics & Reporting | ✅ Comprehensive dashboard with detailed test generation reports and metrics | ❌ No dashboard functionality | ⚠️ Basic UI showing added tests only |
| Test Execution Environment | ✅ Isolated Docker containers for secure test execution and compilation verification | ⚠️ Local Mode: Manual dependency management Docker Mode: Requires Docker runtime |
⚠️ Manual dependency management required |
| Ease of Use | ✅ Intuitive web forms with one-click test generation | ⚠️ env file configuration or download env from web UI for CLI trigger | ✅ Context menu integration with code lens support |
| Test Comparison Tools | ✅ Built-in comparison view for multiple test scenarios | ❌ No comparison functionality | ❌ No comparison functionality |
| API Server | ✅ Dedicated API server for programmatic access | ❌ No API server | ❌ No API server |
| History & Audit Trail | ✅ Comprehensive event history and audit logging | ⚠️ CLI-based history for current user session | ❌ No history management |
| Team Sharing | ✅ Centralized credential sharing via connectors and team-wide test configuration distribution | ❌ No sharing capabilities | ❌ No sharing capabilities |
|
Database Persistence |
✅ Test configurations and connectors are stored in a central database | ⚠️ No persistence. Configuration is persisted locally in the system. | ⚠️ No persistence. Configuration is persisted locally in the system. |
|
Stand-alone system |
❌ UI can not be deployed as a stand-alone and will need to be hosted on a server | ✅ CLI can be deployed as a stand-alone without any API Server or Hosted Server | ✅ Plugin can be deployed as a stand-alone without any API Server or Hosted Server |
|
Deployment |
On Cloud and On Prem | On Linux, Windows, MacOS | From VSCode Marketplace and IntelliJ Disk install |
Legend
- ✅ Full Support: Feature is fully implemented and available
- ⚠️ Partial Support: Feature available with limitations or manual setup required
- ❌ Not Available: Feature is not supported in this deployment option
Deployment Options
Web Interface (UI)
Best for: Teams requiring comprehensive project management, detailed analytics, and centralized administration.
Command Line Interface (CLI)
Best for: Developers preferring terminal-based workflows and automated CI/CD pipeline integration.
IDE Plugin
Best for: Individual developers seeking seamless integration within their development environment.
Application Programming Interface (API)
Best for: Automated CI/CD pipeline integration (limited API are exposed to access the hosted RoostGPT API server).
Self Hosted RoostGPT - OnPrem
Install RoostGPT on Ubuntu Server
Ubuntu Server Requirements
- Ubuntu Server 22.04 or higher
- Minimum CPU - 8 cores
- Minimum RAM - 16 GB
- Minimum Root Disk - 50 GB
- Additional Disk - 250 GB (for /var/tmp/Roost mount point)
Ubuntu user should have preferably passwordless sudo access
Download Roost Deployment Tool
Copy and execute the below bash snippet. The tool will prompt for the needed details and launch RoostGPT stack
curl -sLO https://github.com/roost-io/roost-support/releases/latest/download/roost-deployment-tool
chmod +x roost-deployment-tool
Network Configuration and SSL Certificates
SSL Certificates to the enterprise domain
Copy SSL Certificates to the Ubuntu Server and make a note of the key and cert file location.
It will have to be mentioned in the config.json
Network Configuration
Allow incoming traffic to the below ports
| Protocol | Port | Source IP |
| TCP (HTTPS) | 443 | All IP in the company network |
| SSH | 22 | Only to be used by IT Support Staff |
| TCP | 60001 - 62120 |
Launch RoostGPT stack
Execute the below command to update the stack
./roost-deployment-tool create-stackTo refresh/upgrade Roost version in the stack
./roost-deployment-tool refresh-stackSelf Hosted RoostGPT - Deploy on AWS using Terraform
To self-host RoostGPT stack, we need the below infrastructure resources.
- MySQL or Postgres Database
- SSL Certificates and a DNS domain
- oAuth application related client id, secret and DNS configuration for redirect
- Identify an IP CIDR range and a cloud data-center region and availability zone for configuring cloud compute and networking resources
The below resources will be provisioned using Terraform script
- VPC and corresponding public and private subnets and NAT gateway
- Ubuntu Compute instances (EC2) and associated storage volumes
- Application Load-balancer and target groups
1. Getting Started
Roost provides terraform scripts to spin up and configure the RoostGPT platform easily. Below are the steps for deploying Roost on AWS using Terraform
High-Level Architecture
Roost Terraform scripts create the below components in the AWS cloud
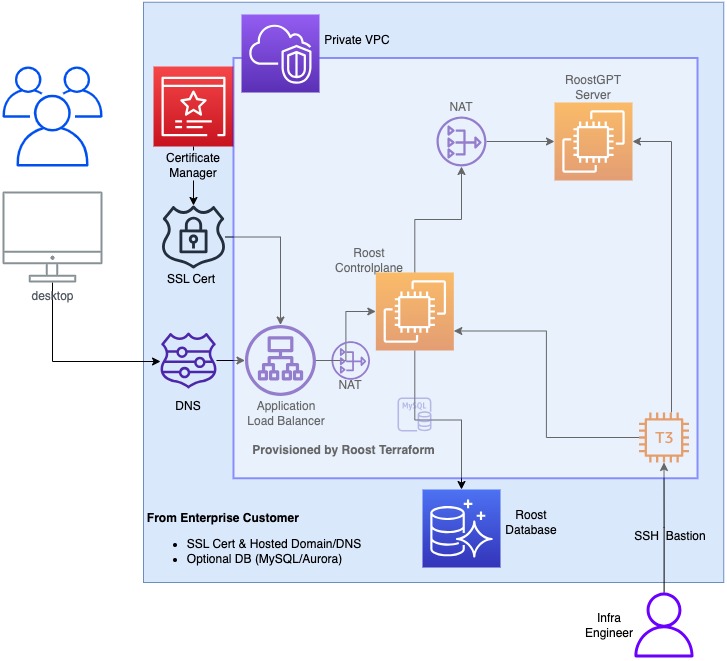
Interactive diagram at https://docs.roost.ai/arch
Prerequisites
- User Account with Admin privileges / Policies enabled to run terraform scripts
- region
- route53_hosted_zone_id
- ec2_ami (for Ubuntu Jammy 22.04)
- enterprise_dns
- ip_block_vpc (VPC CIDR where Roost would be set up)
- okta_client_id or appropriate auth provider ( please refer next section)
- company name
Download the Terraform scripts
curl -LO https://github.com/roost-io/roost-support/raw/refs/heads/master/terraform-ec2.zip2. OAuth Provider Setup
Roost supports various authentication mechanisms as mentioned below
- Okta
- Microsoft Azure ADFS
OKTA Auth Client Setup
- Sign in to your OKTA account with admin privileges (If you do not have an existing Okta account, then sign-up at Home | Okta Developer )
- From the left navigation menu, go to Applications -> Applications.
- Select Create App Integration → OIDC - OpenID Connect → Web Application, then click Next
- Fill in the suitable App integration name, upload the logo.
- Add Sign-in redirect URIs
- https://<DNS_NAME>/login
- Allow Access to users thru Assignments → Controlled Access
- Select the groups of users or Allow access to everyone
- Save and Make a note of the Okta Client ID and the Client Secret (It is needed later in the config below)
- From the left navigation menu, go to Security -> API
- Make a note of Issuer URI for default Authorisation Server
- something like https://{your_domain}.okta.com/oauth2/default
Google Auth Client Setup
-
Integrating Google Sign-In into your web app | Google Sign-In for Websites | Google Developers
-
Create Credentials, Select OAuth Client and Application Type as Web Application
-
Add Authorised JavaScript Origin as
-
https://<DNS_NAME>
-
-
Add Authorised redirect URIs
-
https://<DNS_NAME>/login
-
https://<DNS_NAME>/api/auth/redirect/google
-
-
Download the JSON
-
Make a note of the Google Client ID and the Client Secret (It is needed later in the config below)
Azure ADFS Auth Client Setup
Roost 0Auth2 Setup - Windows Server 2016/2019 - ADFS 4.0
-
Open the Server Manager from Start Menu, Select Tools > AD FS Management
-
From the AD FS Management screen, go to AD FS ➜ Application Groups
-
Click Add Application Group on right panel
-
Fill in a name (Roost) for the application group
-
Select Server Application Web browser accessing a web API and click Next
-
Make note of the Client Identifier value. This will be the value for the
AZURE_ADFS_CLIENT_IDvariable -
Fill the Redirect URI (https://<DNS_NAME>/login ) and click Add, then Next
-
Check the Genrate a shared secret box
-
Use the Copy to clipboard button to retrieve the secret. This will be the value for the
AZURE_ADFS_CLIENT_SECRETvariable. Click Next -
Enter the Web API identifier (Same as RedirectUri - https://<DNS_NAME>/login ) and click Add, then Next
-
On the Access Control Policy screen, select a policy, usually Permit everyone and click Next
-
On the Configure Application Permissions screen, select the scope openid and click Next
-
Review the settings and click Next
-
Close the wizard by clicking Close. Our application is now registered in ADFS.
-
Now, we need to Configure the Claims for Application
-
Open the Properties for the application group we just created.
-
Select the Web application entry (Roost - Web API) and click Edit
-
On the Issuance Transform Rules tab, click the Add Rule button
-
Select Send LDAP Attributes as Claims and click Next
-
Give the rule a name (Roost Claims) and select Active Directory as the attribute store.
-
Now configure the below claims (LDAP Attribute => Outgoing Claim Type):
-
E-Mail-Addresses => E-Mail Address
-
Given-Name => Given Name
-
Surname => Surname
-
SAM-Account-Name => Windows Account Name
-
User-Principal-Name => UPN
-
Click Finish to save the claims
-
You should now see the rule added. Click OK a couple of times to save the settings.
-
Now the setup is complete. We set these 3 values as environment variables:
-
AZURE_ADFS_CLIENT_ISSUER- Domain of ADFS Server (https://adfs.contoso.com) -
AZURE_ADFS_CLIENT_ID- Client Identifier of server application -
AZURE_ADFS_CLIENT_SECRET- Client Secret we copied to clipboard
If don’t want to use Client Secret, then Add an Native Application and pass AZURE_ADFS_CLIENT_SECRET variable as empty
3. Database Setup
Roost stores the status of the GPT workflow and other relevant information in Database. Roost supports MySQL, Postgres and Amazon Aurora DB. Any one database is needed for RoostGPT to work.
Below are the steps to setup an RDS in AWS
Amazon Aurora (MySQL Compatible) OR MySQL
-
Select RDS
-
Choose Create Database
-
Select “Easy Create” for “Amazon Aurora with MYSQL compatibility" or "MySQL"
-
Modify the RDS Security Group to allow TCP port 3306 access to the Control plane Instance security group only
-
Make a note of the writer instance database end-point, user, and password (It is needed later in the config below)
Create a new user with read-write privileges and avoid using an admin login.
# Sample command to create a user using MySQL CLI
# Provide password on prompt

mysql -h <SQL Host URL> -u <root|master|admin> -p
CREATE USER 'Roost'@'%' identified WITH mysql_native_password by 'Roost#123';
CREATE DATABASE roostio;
GRANT ALL on roostio.* to 'Roost'@'%';
# Execute the Roost Schema file, if available
\. /var/tmp/Roost/db/roost.sql
Amazon Aurora (PostgreSQL Compatible) OR PostgreSQL
-
Select RDS
-
Choose Create Database
-
Select “Easy Create” for “Amazon Aurora with PostgreSQL compatibility" or "PostgreSQL"
-
Modify the RDS Security Group to allow TCP port 5432 access to the Control plane Instance security group only
-
Make a note of the writer instance database end-point, user, and password (It is needed later in the config below)
-
Create a new user with read-write privileges and avoid using an admin login.
psql "host=<PG Host URL> user=<admin> dbname=postgres port=5432 sslmode=require"
CREATE DATABASE roostio;                                  -- creates app database [5]
CREATE USER roost WITH PASSWORD 'Roost#123';              -- creates login role [3]
GRANT ALL PRIVILEGES ON DATABASE roostio TO roost;        -- DB-level grant [4]

-- Connect to the new DB (reconnect as admin or roost), then set schema privileges
\c roostio
GRANT USAGE ON SCHEMA public TO roost;
GRANT ALL ON ALL TABLES IN SCHEMA public TO roost;
GRANT USAGE ON ALL SEQUENCES IN SCHEMA public TO roost;
ALTER DEFAULT PRIVILEGES IN SCHEMA public
  GRANT ALL ON TABLES TO roost;
ALTER DEFAULT PRIVILEGES IN SCHEMA public
  GRANT USAGE ON SEQUENCES TO roost;

-- Execute the Roost Schema file, if available
\i /var/tmp/Roost/db/roost.sql
4. Terraform variables
Please follow the below steps to modify terraform files to incorporate the
- Copy
terraform.tfvars.originalasterraform.tfvars - Fill in the below details (sample values are already provided)
enterprise_dns = "subdomain.domain.com"
admin_email = "comma separated list of emails"
enterprise_email_domain = "email-domain.com"
company = ""
license_key = ""
roost_jwt_token = "32-character-secure-long-secret"
roost_version = "v1.1.17"

az1_suffix = "b"
az2_suffix = "c"
certificate_arn = "arn:aws:acm:region:account:certificate/cert-id"
ec2_ami = "ami-023a307f3d27ea427"
region = "region"
ip_block_vpc="172.32.255.192"
route53_hosted_zone_id = ""
key_pair = "roost-ssh"

azure_tenant_id = ""
azure_client_id = ""
azure_client_secret = ""
okta_client_id = "your client id"
okta_client_secret = "your client secret"
okta_issuer = "https://account.okta.com/oauth2/default"

is_own_mysql = false
mysql_db_name = "roostio"
mysql_host = "mysqldb_host_url"
mysql_password = "Roost#123"
mysql_port = 3306
mysql_root_password = "Admin#123"
mysql_username = "Roost"
Terraform Variable Definitions
|
Field |
Values | Description |
| roost_version | "v1.1.17" | |
| license_key | ||
| prefix | "terraform-gpt" | |
| region | "us-west-1" | |
| az1_suffix | "b" | |
| az2_suffix | "c" | |
| deletion_protection | false | |
| route53_hosted_zone_id | ||
| enterprise_dns | "roostgpt.example.com" | |
| enterprise_ssl_certificate_path | "/var/tmp/Roost/certs/server.cer" | |
| enterprise_ssl_certificate_key_path | "/var/tmp/Roost/certs/server.key" | |
| certificate_arn | "" | |
| ec2_ami | "ami-03df6dea56f8aa618" | |
| key_pair | "roost-gpt-keypair" | |
| generate_key_pair | true | |
| device_name | "sdh" | |
| ip_block_vpc | "172.32.255.192" | |
| instance_type_controlplane | "c5a.2xlarge" | |
| instance_type_jumphost | "t3.micro" | |
| disk_roostgpt | 150 | |
| disk_jumphost | 150 | |
| disk_controlplane | 150 | |
| google_client_id | ||
| google_client_secret | ||
| github_client_id | ||
| github_client_secret | ||
| linkedin_client_id | ||
| linkedin_client_secret | ||
| azure_tenant_id | ||
| azure_client_id | ||
| azure_client_secret | ||
| okta_client_id | "0oa4bweaxcqn2sfTu5d7" | |
| okta_client_secret | "D5oRtWXUWcl9gp1312dVtuSoumU4vrECO4wSsqAO" | |
| okta_issuer | ||
| roost_jwt_token | ||
| company | ||
| company_logo | "https://roost.ai/hubfs/logos/Roost.ai-logo-gold.svg" | |
| enterprise_email_domain | "example.com" | |
| admin_email | "admin@email" | |
| admin_email_pass | "" | |
| senders_email | "sender@email" | |
| is_own_mysql | false | |
| db_type | "mysql" | |
| mysql_host | "mysqldb_host_url" | |
| mysql_password | "Roost#123" | |
| mysql_username | "Roost" | |
| mysql_port | 3306 | |
| mysql_db_name | "roostio" | |
| mysql_root_password | "Admin#123" | |
| senders_email_pass | ||
| email_smtp_host |
5. Upgrading/Maintaining RoostGPT Control-plane
There are multiple options available to refresh or upgrade the RoostGPT stack. The infrastructure engineer can use either of these approaches.
a. Using Terraform Script to upgrade RoostGPT version
Update Terraform Variables in "terraform.tfvars" to reflect the appropriate Roost Version
|
Field |
Values |
|
roost_version |
v1.1.17 |
Run below commands:
terraform applyb. Using Terraform Script to refresh control-plane (without any config change)
Run below commands
terraform apply --replace="null_resource.provision-controlplane-system" --replace="null_resource.provision-roostgpt-server" --replace="null_resource.run-controlplane-services"c. Using SSH to control-plane instance
RoostGPT control-plane runs a docker compose script and the entire offering can be updated using the below given steps.
- SSH Connect to your infrastructure bastion instance as ubuntu user
- Execute the below snippet with the appropriate Roost Version (after replacing v1.1.17)
ssh cp "ROOST_VER='v1.1.17' /var/tmp/Roost/bin/roost-enterprise.sh -c /var/tmp/Roost/config.json -i roostai"RoostGPT Command Line Interface (CLI)
Execute RoostGPT from your system as a local binary. The RoostGPT binary allows for unmatched flexibility during test generation, by allowing you to trigger test generation both locally and through git through the use of one simple .env file.
Executable is available for MacOS, Windows and Linux.
RoostGPT binary is available at https://github.com/roost-io/roost-support/releases
Download instructions
For Windows
Download the roostgpt-win.exe from https://github.com/roost-io/roost-support/releases/download/v1.1.17/roostgpt-win.exe
Add the "roostgpt-win.exe" binary to your PATH environment variable
For Ubuntu and MacOS
curl https://raw.githubusercontent.com/roost-io/roost-support/master/roostgpt.sh | sudo bash -CLI Commands
roostgpt (for mac) & ./roostGPT-win.exe (for windows)
This command is used to run the RoostGPT CLI on your operating system.
-
-h, --help: Displays the help message that provides information about the available options and usage. roostgpt version update: Update roostgpt version.roostgpt config create: Creates roostgpt configuration file. The configuration file contains environment variables used by RoostGPT application.
--output-dir, -o <path>: Creates a configuration file in a specific directory. The configuration file contains environment variables used by the RoostGPT application. Default path is pwd.--name <name>: Creates the configuration file with specific name. Default name is default.env.
-
roostgpt config update: Updates the roostgpt configuration file.-
--config, -c <path>: Specifies the location of the environment configuration file. The configuration file contains environment variables used by the RoostGPT application. -
--name <name>: loads pwd/$name.env. It is ignored if the --file is provided.
-
-
roostgpt test create: Triggers the test generation.--config,-c <path>: Path to the configuration file if provided, Default value is pwd/default.env.--docker,-d: Generate tests in a docker environment, see supported features to see what tool/language versions are supported.--verbose,-v: Enable verbose logging(Debug mode).-
--interactive, -i: Enable interactive mode.
roostgpt test improve: Improve the selected test based on user feedback.--docker,-d: Improve tests in a docker environment, see supported features to see what tool/language versions are supported.--verbose,-v: Enable verbose logging(Debug mode).--interactive, -i: Enable interactive mode.
roostgpt test retrigger: Re-trigger the chosen test from where it left off during its last execution.
--docker,-d: Re-trigger tests in a docker environment, see supported features to see what tool/language versions are supported.--verbose,-v: Enable verbose logging(Debug mode).--interactive, -i: Enable interactive mode.
-
roostgpt test support : Involve RoostGPT support to improve the selected test.
--verbose,-v: Enable verbose logging(Debug mode).
-
roostgpt test execute : Execute the selected test
--docker,-d: Re-trigger tests in a docker environment, see supported features to see what tool/language versions are supported.--verbose,-v: Enable verbose logging(Debug mode).--interactive, -i: Enable interactive mode.
-
roostgpt test view: View all recent test plans and their triggers -
roostgpt analysis: Analyse the existing tests and scenarios and generate a report.--config,-c <path>: Path to the configuration file if provided, Default value is pwd/default.env.--docker,-d: Re-trigger tests in a docker environment, see supported features to see what tool/language.--verbose,-v: Enable verbose logging(Debug mode).
Instructions for creating .env file
An easy way to download the .env file is to use https://app.roost.ai/gptCLIForm
The .env file should be in the same folder path as RoostGPT binary.
Here is what the content of your .env file will look like:
# GIT env vars
GIT_TYPE=github                                  # Default is github; Supports [github, gitlab, azure, bitbucket, local]
HOSTED_TYPE=cloud                                # Default is cloud; Supports [cloud, hosted]
GIT_HOSTED_URL=                                  # Required if HOSTED_TYPE=hosted
USE_SSH=false                                    # Optional; Default is false; Supports [true, false]; SSH based auth for Git
LOCAL_PROJECT_PATH=                              # Required if GIT_TYPE is local, Path to your workspace.
SOURCE_GIT_CLONE_URL=                            # Optional; the source repo clone URL
SOURCE_GIT_TOKEN=                                # Required
SOURCE_OWNER_NAME=                               # Required
SOURCE_REPO_NAME=                                # Required
SOURCE_REPO_ID=                                  # Required for GIT_TYPE=gitlab
SOURCE_PROJECT_NAME=                             # Required for GIT_TYPE=azure
SOURCE_PROJECT_ID=                               # Required for GIT_TYPE=bitbucket
SOURCE_BASE_BRANCH=                              # Required
SOURCE_RELATIVE_DIRECTORY=                       # Optional; the relative path of the repository
SAME_TARGET_DETAIL=true                          # Optional; Default true, Supports [true, false]
DESTINATION_GIT_CLONE_URL=                       # Optional; the destination repo clone URL
DESTINATION_GIT_TOKEN=                           # Required if SAME_TARGET_DETAIL=false
DESTINATION_OWNER_NAME=                          # Required if SAME_TARGET_DETAIL=false
DESTINATION_REPO_NAME=                           # Required if SAME_TARGET_DETAIL=false
DESTINATION_REPO_ID=                             # Required if SAME_TARGET_DETAIL=false and GIT_TYPE=gitlab
DESTINATION_PROJECT_NAME=                        # Required for GIT_TYPE=azure
DESTINATION_PROJECT_ID=                          # Required if SAME_TARGET_DETAIL=false and GIT_TYPE=bitbucket
DESTINATION_BASE_BRANCH=                         # Required if SAME_TARGET_DETAIL=false
ENABLE_SECRET_SCANNING_BYPASS=                    # Optional; Default is true; Supports [true, false]

# Open AI env vars
OPENAI_API_MODEL=gpt-4                           # Optional; Default is gpt-4
OPENAI_BASE_URL=                                  # Optional; Default is "https://api.openai.com/v1"
OPENAI_API_KEY=                                  # Required if AI_TYPE=openai

# Vertex AI env vars
VERTEX_FINE_TUNE=false                           # Optional; Default is false, Supports [true, false]
VERTEX_CREDENTIAL_TYPE=                          # Required if AI_TYPE=vertexai; Supports [file, token]
VERTEX_PROJECT_ID=                               # Required if AI_TYPE=vertexai
VERTEX_REGION=                                   # Required if AI_TYPE=vertexai and VERTEX_FINE_TUNE=true
VERTEX_BEARER_TOKEN=                             # Required if AI_TYPE=vertexai and VERTEX_CREDENTIAL_TYPE=token
VERTEX_MODEL=                                    # Required if AI_TYPE=vertexai; Supports [text-bison, code-bison, codechat-bison, text-bison-32k, code-bison-32k, codechat-bison-32k, gemini-pro]
VERTEX_SERVICE_ACCOUNT_KEY=                      # Required if AI_TYPE=vertexai and VERTEX_CREDENTIAL_TYPE=file; path to the service account key file

# Azure Open AI env vars
AZURE_OPENAI_ENDPOINT=                           # Required if AI_TYPE=azure_open_ai
AZURE_DEPLOYMENT_NAME=                           # Required if AI_TYPE=azure_open_ai
AZURE_OPENAI_KEY=                                # Required if AI_TYPE=azure_open_ai
AZURE_OPENAI_VERSION=2024-02-15-preview          # Optional Default is 2024-02-15-preview
AZURE_INFERENCE_AI=                              # Optional; Default is false; Supports [true, false]

# Open source env vars
OPEN_SOURCE_MODEL_ENDPOINT=                      # Required if AI_TYPE=open_source_ai
OPEN_SOURCE_MODEL=                               # Optional; Supports [meta-llama/Llama-2-13b-chat, HuggingFaceH4/starchat-beta]

# Sagemaker model env vars
SAGEMAKER_MODEL_ENDPOINT=                        # Required if AI_TYPE=sagemake_model

# Claude AI env vars
CLAUDE_AI_MODEL=                                 # Required if AI_TYPE=claude_ai
CLAUDE_AI_API_KEY=                               # Required if AI_TYPE=claude_ai

# DBRX AI env vars
DBRX_MODEL_ENDPOINT=                             # Required if AI_TYPE=dbrx
DBRX_AUTH_TOKEN=                                 # Required if AI_TYPE=dbrx
DBRX_MODEL_NAME=                                 # Required if AI_TYPE=dbrx

# AWS Bedrock env vars
AWS_BEDROCK_MODEL=                               # Required if AI_TYPE=AWS_BEDROCK
AWS_DEFAULT_REGION=                              # Required if AI_TYPE=AWS_BEDROCK
AWS_ACCESS_KEY_ID=                               # Optional if AI_TYPE=AWS_BEDROCK
AWS_SECRET_ACCESS_KEY=                           # Optional if AI_TYPE=AWS_BEDROCK
AWS_SESSION_TOKEN=                               # Optional if AI_TYPE=AWS_BEDROCK

# Advanced AI env vars
AI_TEMPERATURE=0.2                               # Optional; Default value is 0.2
USE_ASSISTANT=false                              # Optional; Use Assistant feature in openai. Default:false

# Jira board env vars
JIRA_HOST_NAME=                                  # Required if TEST_TYPE=functional and BOARD_TYPE=jira
JIRA_EMAIL=                                      # Required if TEST_TYPE=functional and BOARD_TYPE=jira
JIRA_TOKEN=                                      # Required if TEST_TYPE=functional and BOARD_TYPE=jira
JIRA_ID=                                         # Optional if TEST_TYPE=functional and BOARD_TYPE=jira

# Azure board env vars
AZURE_ORG=                                       # Required if TEST_TYPE=functional and BOARD_TYPE=azure
AZURE_PROJECT=                                   # Required if TEST_TYPE=functional and BOARD_TYPE=azure
AZURE_TOKEN=                                     # Required if TEST_TYPE=functional and BOARD_TYPE=azure
AZURE_WORK_ITEM_ID=                              # Optional if TEST_TYPE=functional and BOARD_TYPE=azure

# Advanced Jira/Azure board env vars
CREATE_API_SPEC=                                 # Optional; Used for TEST_TYPE=functional
CREATE_EXCEL=                                    # Optional; Default is false; Supports [true, false]
TICKET_INPUT_TYPE=                               # Optional; Default is id; Supports [id, file]
TICKET_FILES=                                    # Required if TICKET_INPUT_TYPE is file, List of comma separated files

# Log env vars
LOG_SOURCE=elks                                  # Optional; Default is elks
LOG_SOURCE_PATH=                                 # Optional; the log file path
LOG_FILE_ENCODING=                               # Optional; the log file encodeing; Default is utf-8
LOG_ELASTICSEARCH_URL=                           # Optional; the Elastic search URL
LOG_ELASTICSEARCH_USER=                          # Optional; the Elastic search user name
LOG_ELASTICSEARCH_TOKEN=                         # Optional; the Elastic search token
LOG_ELASTICSEARCH_API_KEY=                       # Optional; the Elastic search api key

# Behavioural test cases env vars
BEHAVIORAL_TEST_TYPE=                            # Optional; Supports [gherkin]
BEHAVIORAL_TEST_SOURCE=                          # Optional; Supports [file, gitpath, url]
BEHAVIORAL_TEST_FILE_PATH=                       # Optional; path of the source file if source is file/gitpath. Relative path in case of gitpath.
BEHAVIORAL_TEST_URL=                             # Optional; URL of the source file if source is url

# API Spec env vars
API_SPEC_TYPE=                                   # Optional; Supports [swagger, postman, raml]
API_SPEC_SOURCE=                                 # Optional; Supports [file, gitpath, url]
API_SPEC_FILE_PATH=                              # Optional; path of the source file if source is file/gitpath. Relative path in case of gitpath.
API_SPEC_URL=                                    # Optional; URL of the source file if source is url
API_SPEC_ALIAS=

# Proto Spec env cars
PROTO_SPEC_SOURCE=                               # Optional; Supports [file, gitpath, url, gitrepo]
PROTO_SPEC_FILE_PATH=                            # Optional; path of the source file if source is file/gitpath. Relative path in case of gitpath
PROTO_SPEC_URL=                                  # Optional; URL of the source file if source is url

PROTO_SPEC_GIT_REPO_URL=                         # Optional; the proto repo clone URL
PROTO_SPEC_GIT_BRANCH=                           # Required: branch of git repo of proto file
PROTO_SPEC_REPO_NAME=                            # Required; Repo name of proto file
PROTO_SPEC_REPO_ID=                              # Required if GIT_TYPE=gitlab
PROTO_SPEC_PROJECT_NAME=                         # Required for GIT_TYPE=azure
PROTO_SPEC_PROJECT_ID=                           # Required for GIT_TYPE=bitbucket

API_TEST_SERVER_CONFIG=                          # Optional; The api server config

# Cypress test env vars
SCREENSHOTS_SOURCE=                              # Optional; Used for cypress test. Supports [file, gitpath, url]
SCREENSHOTS_URL=                                 # Optional; URL of the source file if source is url
SCREENSHOTS_FILE_PATH=                           # Optional; path of the source file if source is file/gitpath. Relative path in case of gitpath

HTTP_VERBS_FOR_TESTING=get,post,put,patch,delete # Optional; Default is "get,post,put,patch,delete", Supports all the combinations of http verbs. The specific http methods to be tested for all APIs. Enter "," seperated values here.
REGEX_HTTP_ENDPOINTS_FOR_TESTING=                # Optional; Regex string that matches to specific endpoints that needs to be tested. If empty, all the endpoints will be tested.

# Application test env vars
APPLICATION_ENTRYPOINT=                          # Required; if you need to generate application tests along with unit tests. This feature is supported only for GPT Turbo models. Use a relative path from the project root.

# License env vars
ROOST_DOMAIN=app.roost.ai                        # Optional; Default is app.roost.ai
ROOST_TOKEN=                                     # Optional; the Roost token or license filepath, default $HOME/.roost/license.ral
TELEMETRY=true                                   # Optional; Default is true, Supports [true, false], send telemetry data to roost, no private information is shared.

# Additional env vars
TEST_NAME=roost-test                             # Optional; Default is roost-test
ROOST_DIR=/var/tmp/Roost/RoostGPT                # Optional; Default is /var/tmp/Roost/RoostGPT
LANGUAGE=java                                    # Optional; Default is java; Supports [java, go, python, csharp, nodejs, cpp]
AI_TYPE=openai                                   # Optional; Default is openai; Supports [openai, vertexai, azure_open_ai, open_source_ai, sagemaker_model, claude_ai, dbrx, bedrock_ai, deepseek_ai]
JAVA_BUILD_TOOL=maven                            # Optional; Default is maven; Supports [maven, gradle]
PACKAGES_TO_SCAN=*                               # Optional; Default is "*"; used for LANGUAGE=java, for generating tests for specific packages; Enter comma seperated values. E.g. "com.demo.sample,"com.example.products"
ITERATION=1                                      # Optional; Set VERIFY_TEST=true to enable iteration; Default value of ITERATION is 1
TIMEOUT=1                                        # Optional; Default is 1 hour
ROOST_USER_INPUT=                                # Optional; The user input will be used to generate tests.
TEST_TYPE=unit                                   # Optional; Default is unit Supports [unit, functional, artillery, integration, api-spec-test, ui-test, functional-source]
BOARD_TYPE=jira                                  # Optional; Default is jira; Supports [jira, azure, none]
MAX_DEPTH=-1                                     # Optional; Default is -1; if MAX_DEPTH is -1, it will traverse all the sub directories else the maximum depth directories to look for
TEST_FRAMEWORK=                                  # Optional; Default is "pytest" for Python, "gotest" for Golang, "JUnit4" for Java, "nunit" for CSharp, "jest" for Node.js, "postman" for Postman test-script. Supports [pytest, unittest] for Python, [gotest] for Golang, [JUnit4, JUnit5] for Java, [nunit] for Csharp, [jest] for Node.js, [postman, artillery, rest-assured, karate, playwright] for [test_type: api-spec-test]
FUNCTIONS_TO_TEST=                               # Optional; List of function names to be tested, separated by comma. Name to be specified as module.[class.]method OR module.function
VERIFY_TEST=false                                # Optional; Default is false, Supports [true, false]
VULNERABILITY_GEN=false                          # Optional; Default is false, Supports [true, false]
CUSTOM_TAGS=                                     # Optional; The tags to be attached to test code, so that the test's can run based on tags
CONSIDER_EXISTING_TEST=false                     # Optional; Default is false, Supports [true, false], used for Java, python, Golang unit test generation, It scans your repository to identify any existing tests for the specified function. If tests are found, it incorporates them into its consideration and generates additional test cases as needed
CREATE_UNIQUE_BRANCH_FOR_REPORT=                 # Optional; Default is false; Supports [true, false]
ONE_TEST_FILE_PER_SOURCEFILE=                    # Optional; valid for LANGUAGE=go , if user want to generate a single test file per source file
GRADING_NOTES=
USER_SCENARIOS=
USE_CACHE=

# UI Test vars
BROWSER_USE_HEADLESS=true                        # Optional; Default is false; Supports [true, false]
URLS_TO_TEST=                                    # Required if TEST_TYPE="ui-test" and TEST_FRAMEWORK="playwright"

# User can provide additional env var starting with "UI_" prefix
UI_LOGIN_TYPE=                                   # Optional; use only if TEST_TYPE="ui-test" and TEST_FRAMEWORK="playwright"
UI_SITE_USERNAME=                                # Optional; use only if TEST_TYPE="ui-test" and TEST_FRAMEWORK="playwright"
UI_SITE_PASSWORD=                                # Optional; use only if TEST_TYPE="ui-test" and TEST_FRAMEWORK="playwright"                                       #

# Language version env vars, Used when RoostGPT is run in docker mode, visit https://docs.roost.ai/topics/roostgpt/page/cli to check the supported language versions
JAVA_VERSION=17                                  # Optional; Default is 17, Used for TEST_FRAMEWORK "JUnit4, "JUnit5", "karate", "rest-assured"
MAVEN_VERSION=3.8.6                              # Optional; Default is 3.8.6, Used for TEST_FRAMEWORK "JUnit4, "JUnit5", "karate", "rest-assured"
GRADLE_VERSION=8.6                               # Optional; Default is 8.6, Used for TEST_FRAMEWORK "JUnit4, "JUnit5", "karate", "rest-assured"
GO_VERSION=1.19.9                                # Optional; Default is 1.19.9, Used for TEST_FRAMEWORK "gotest"
PYTHON_VERSION=3                                 # Optional; Default is 3, Used for TEST_FRAMEWORK "pytest", "unittest"
DOTNET_VERSION=8                                 # Optional; Default is 8, Used for TEST_FRAMEWORK "nunit"
NODE_VERSION=18.18.0                             # Optional; Default is 18.18.0, Used for TEST_FRAMEWORK "artillery", "postman", "rest-assured", "karate", "jest", "mocha"
KARATE_VERSION=1.5.1                             # Optional; Default is 1.5.1, Used for TEST_FRAMEWORK "karate",
Note: If a value in your .env file contains the '#' character, enclose the entire value in quotes. This prevents the '#' from being interpreted as the start of a comment.
Example: SECRET_KEY="my#secret#key"
Details about env variables
Here's a description of each variable:
# Git env vars
- GIT_TYPE
Description: Specifies the type of Git repository.
Default Value: "github"
Supported Values: "github", "gitlab", "azure", "bitbucket", "local"
Optional/Required: Optional - HOSTED_TYPE
Description: Indicates where the Git platform is accessible.
Default Value: "cloud"
Supported Values: "cloud", "hosted"
Optional/Required: Optional - GIT_HOSTED_URL
Description: The URL of the hosted Git platform.
Optional/Required: Required if HOSTED_TYPE is "hosted" - USE_SSH
Description: Specifies whether to use SSH-based authentication for Git.
Default Value: "false"
Supported Values: "true", "false"
Optional/Required: Optional - LOCAL_PROJECT_PATH
Description: Path to your workspace.
Optional/Required: Required if GIT_TYPE is "local" - SOURCE_GIT_CLONE_URL
Description: Clone URL for the source repository.
Optional/Required: Optional - SOURCE_GIT_TOKEN
Description: Token for authenticating the specific source Git repository.
Optional/Required: Required - SOURCE_OWNER_NAME
Description: Name of the source repository owner (Git username).
Optional/Required: Required - SOURCE_REPO_NAME
Description: Name of the source repository.
Optional/Required: Required - SOURCE_REPO_ID
Description: ID of the source repository.
Optional/Required: Required if GIT_TYPE is "gitlab" - SOURCE_PROJECT_NAME
Description: Name of the source project.
Optional/Required: Required if GIT_TYPE is "azure" - SOURCE_PROJECT_ID
Description: ID of the source project.
Optional/Required: Required if GIT_TYPE is "bitbucket" - SOURCE_BASE_BRANCH
Description: Base branch to be tested in the source repository.
Optional/Required: Required - SOURCE_RELATIVE_DIRECTORY
Description: Relative directory path within the source repository.
Optional/Required: Optional - SAME_TARGET_DETAIL
Description: Indicates if the destination Git details are the same as the source Git details.
Default Value: "true"
Supported Values: "true", "false"
Optional/Required: Optional - DESTINATION_GIT_CLONE_URL
Description: Clone URL for the destination repository.
Optional/Required: Optional - DESTINATION_GIT_TOKEN
Description: Token for authenticating the specific destination Git repository.
Optional/Required: Required if SAME_TARGET_DETAIL is "false" - DESTINATION_OWNER_NAME
Description: Name of the destination repository owner (Git username).
Optional/Required: Required if SAME_TARGET_DETAIL is "false" - DESTINATION_REPO_NAME
Description: Name of the destination repository.
Optional/Required: Required if SAME_TARGET_DETAIL is "false" - DESTINATION_REPO_ID
Description: ID of the destination repository.
Optional/Required: Required if SAME_TARGET_DETAIL is "false" and GIT_TYPE is "gitlab" - DESTINATION_PROJECT_NAME
Description: Name of the destination project.
Optional/Required: Required if SAME_TARGET_DETAIL is "false" and GIT_TYPE is "azure" - DESTINATION_PROJECT_ID
Description: ID of the destination project.
Optional/Required: Required if SAME_TARGET_DETAIL is "false" and GIT_TYPE is "bitbucket" - DESTINATION_BASE_BRANCH
Description: Base branch in which the test code is to be pushed in the destination repository.
Optional/Required: Required if SAME_TARGET_DETAIL is "false"
# Open AI env vars
- OPENAI_API_MODEL
Description: Specifies the type of the OpenAI API model to be used.
Default Value: "gpt-4"
Supported Values: "gpt-4", "gpt-3.5-turbo", etc. (Availability of models depends on the OPENAI_API_KEY).
Optional/Required: Optional
- OPENAI_API_KEY
Description: The API key required for accessing the OpenAI API.
Optional/Required: Required if AI_TYPE is "openai"
# AZURE Open AI env vars
-
AZURE_OPENAI_ENDPOINTDescription: The API endpoint used to access Azure OpenAI services.Optional/Required: Required if AI_TYPE is "azure_open_ai"
-
AZURE_DEPLOYMENT_NAMEDescription: The name of the Azure OpenAI deployment you wish to use.Optional/Required: Required if AI_TYPE is "azure_open_ai"
-
AZURE_OPENAI_KEYDescription: The API key required for authenticating requests to Azure OpenAI.Optional/Required: Required if AI_TYPE is "azure_open_ai"
-
AZURE_OPENAI_VERSIONDescription: Specifies the version of the Azure OpenAI API to be used.
Default Value: "2024-02-15-preview"Optional/Required: Optional
#Bedrock AI env vars
- AWS_BEDROCK_MODEL
Description: Indicates which bedrock model should be used.
Optional/Required: Required if AI_TYPE is "bedrock_ai" - AWS_DEFAULT_REGION
Description: The AWS region of the model hosted
Optional/Required: Required if AI_TYPE is "bedrock_ai"
- AWS_ACCESS_KEY_ID
Description: AWS Access Key ID Credentials
Optional/Required: Optional. Can be exported in the environment where Roost Binary will be running
- AWS_SECRET_ACCESS_KEY
Description: AWS Secret Access Key ID Credentials
Optional/Required: Optional. Can be exported in the environment where Roost Binary will be running - AWS_SESSION_TOKEN
Description: AWS Session Token Credentials
Optional/Required: Optional. Can be exported in the environment where Roost Binary will be running
# Vertex AI env vars
- VERTEX_FINE_TUNE
Description: Indicates whether fine-tuning is enabled for the model.
Default Value: "false"
Supported Values: "true", "false" - VERTEX_PROJECT_ID
Description: The ID of the Vertex project you are working with.
Optional/Required: Required if AI_TYPE is "vertexai"
- VERTEX_REGION
Description: The region where the Vertex project is located. For example, "us-central1".
Optional/Required: Required if AI_TYPE is "vertexai" and VERTEX_FINE_TUNE is "true"
- VERTEX_BEARER_TOKEN
Description: The bearer token used for authenticating requests to the Vertex API.
Optional/Required: Required if AI_TYPE is "vertexai"
- VERTEX_MODEL
Description: The name of the Vertex model to be used.
Supported Values: "text-bison", "code-bison"
Optional/Required: Required if AI_TYPE is "vertexai"
# Open Source AI env vars
-
OPEN_SOURCE_MODEL_ENDPOINTDescription: The API endpoint used to access the Open Source AI model.Optional/Required: Required if AI_TYPE is "open_source_ai"
-
OPEN_SOURCE_MODELDescription: The name of the Open Source AI model you wish to use.Supported Values: "meta-llama/Llama-2-13b-chat", "HuggingFaceH4/starchat-beta"Optional/Required: Optional
# SageMaker Model env vars
-
SAGEMAKER_MODEL_ENDPOINTDescription: The endpoint where the SageMaker model is hosted.Optional/Required: Required if AI_TYPE is "sagemaker_model"
# Claude AI env vars
-
CLAUDE_AI_MODELDescription: Specifies the type of Claude AI model to be used.Supported Values: "claude-3-opus-20240229", "claude-3-sonnet-20240229", "claude-3-haiku-20240307"Optional/Required: Required if AI_TYPE is "claude_ai"
-
CLAUDE_AI_API_KEYDescription: The API key required for accessing the Claude AI API.Optional/Required: Required if AI_TYPE is "claude_ai"
# DBRX AI env vars
-
DBRX_MODEL_ENDPOINTDescription: The endpoint where the DBRX AI model is hosted.Optional/Required: Optional
-
DBRX_AUTH_TOKENDescription: The authentication token required for accessing the DBRX model.Optional/Required: Required if AI_TYPE is "dbrx"
-
DBRX_MODEL_NAMEDescription: The name of the DBRX model you wish to use.Optional/Required: Required if AI_TYPE is "dbrx"
# Advanced AI env vars
-
AI_TEMPERATUREDescription: Specifies the temperature setting for AI responses, which influences the creativity and variability of the test generation. A higher value results in more creative and varied outputs, while a lower value produces more deterministic responses.Default Value: 0.6Supported Values: Any numeric value, typically between 0.0 and 1.0.Optional/Required: Optional
- USE_ASSISTANT
Description: Indicates whether to use the Assistant feature in OpenAI.Supported Values: "true", "false"Optional/Required: Optional
# Jira board env vars
-
JIRA_EMAILDescription: The email address associated with your Jira account.Optional/Required: Required if TEST_TYPE is "functional" and BOARD_TYPE is "jira"
-
JIRA_HOST_NAMEDescription: The hostname of your Jira instance (e.g., jira.company.com).Optional/Required: Required if TEST_TYPE is "functional" and BOARD_TYPE is "jira"
-
JIRA_PASSWORDDescription: The password for your Jira account.Optional/Required: Required if TEST_TYPE is "functional" and BOARD_TYPE is "jira"
-
JIRA_IDDescription: The Jira ID associated with your account, often used as a unique identifier.Optional/Required: Required if TEST_TYPE is "functional" and BOARD_TYPE is "jira"
# Azure board env vars
-
AZURE_ORGDescription: The organization associated with your Azure DevOps account.Optional/Required: Required if TEST_TYPE is "functional" and BOARD_TYPE is "azure"
-
AZURE_TOKENDescription: The access token for authenticating with Azure DevOps.Optional/Required: Required if TEST_TYPE is "functional" and BOARD_TYPE is "azure"
-
AZURE_PROJECTDescription: The name of the Azure DevOps project.Optional/Required: Required if TEST_TYPE is "functional" and BOARD_TYPE is "azure"
-
AZURE_WORK_ITEM_IDDescription: The ID associated with the relevant work item in Azure DevOps.
# Advanced Jira/Azure board env vars
-
CREATE_API_SPECDescription: Used for functional test typeOptional/Required: Required if TEST_TYPE=functional
# Log env vars
-
LOG_SOURCEDescription: Origin from where the logs are generated.Default Value: "elks"Optional/Required: Optional
-
LOG_SOURCE_PATHDescription: Location where the log files are stored.Optional/Required: Optional
-
LOG_ELASTICSEARCH_URLDescription: The URL for the Elasticsearch instance.Optional/Required: Optional
-
LOG_ELASTICSEARCH_USERDescription: Username for accessing Elasticsearch resources.Optional/Required: Optional
-
LOG_ELASTICSEARCH_TOKENDescription: Authentication token used for accessing Elasticsearch resources.Optional/Required: Optional
-
LOG_ELASTICSEARCH_API_KEYDescription: API key used to authenticate and authorize access to Elasticsearch APIs.Optional/Required: Optional
-
LOG_FILE_ENCODINGDescription: Used to encode the log file, default is utf-8, supports [utf-8, utf-16le].Optional/Required: Optional
# Behavioural Test cases env vars
-
BEHAVIORAL_TEST_TYPEDescription: Specifies the type of behavioral tests to be used.Supported Values: "gherkin"Optional/Required: Optional
-
BEHAVIORAL_TEST_SOURCEDescription: Specifies the source location for the behavioral test data.Supported Values: "file", "gitpath", "url"Optional/Required: Optional
-
BEHAVIORAL_TEST_FILE_PATHDescription: Path to the source file if the BEHAVIORAL_TEST_SOURCE is "file" or "gitpath". For "gitpath", this should be a relative path within the repository.Optional/Required: Optional
-
BEHAVIORAL_TEST_URLDescription: The URL of the source file if the BEHAVIORAL_TEST_SOURCE is "url".Optional/Required: Optional
# API Spec env vars
-
API_SPEC_TYPEDescription: Specifies the type of API specification to be used.Supported Values: "Swagger", "Postman"Optional/Required: Optional
-
API_SPEC_SOURCEDescription: Specifies the source location for the API specification data.Supported Values: "file", "gitpath", "url"Optional/Required: Optional
-
API_SPEC_FILE_PATHDescription: Path to the source file if API_SPEC_SOURCE is "file" or "gitpath". For "gitpath", this should be a relative path within the repository.Optional/Required: Optional
-
API_SPEC_URLDescription: The URL of the source file if API_SPEC_SOURCE is "url".Optional/Required: Optional
-
API_SPEC_ALIAS:Optional/Required: Optional
# Application test env variables
-
APPLICATION_ENTRYPOINTDescription: Specifies the relative path of the application's entry point from the project root. This is used when application test generation is required in addition to unit tests.Supported Values: Any valid relative path to the entry point file or directory within the project. Only supported for GPT-4-turbo models.Optional/Required: Optional
# API test env vars
-
HTTP_VERBS_FOR_TESTINGDescription: Specifies the HTTP methods to be tested for all APIs. This allows you to filter which HTTP verbs (methods) should be included in the tests.Default Value: "get,post,put,patch,delete"Supported Values: Any combination of HTTP verbs, separated by commas (e.g., "get,post,put,patch,delete").Optional/Required: Optional
-
REGEX_HTTP_ENDPOINTS_FOR_TESTINGDescription: A regular expression string used to match specific endpoints that need to be tested. If this variable is left empty, all endpoints will be included in the testing.Supported Values: Any valid regex pattern to filter endpoints.Optional/Required: Optional
# License env vars
-
ROOST_DOMAINDescription: Specifies the Roost domain to be used. This defines the base URL for RoostGPT services.Default Value: "app.roost.ai"Supported Values: Any valid Roost domain URL.Optional/Required: Optional
-
ROOST_TOKENDescription: The authentication token required for accessing RoostGPT CLI. This token is necessary for authenticating and authorizing your requests to RoostGPT.Optional/Required: Required
-
TELEMETRYDescription: Determines whether telemetry data is sent to Roost. Telemetry data helps improve the service but does not include private information.Default Value: "true"Supported Values: "true", "false"Optional/Required: Optional
# Additional vars
-
TEST_NAMEDescription: The name assigned to the test.Default Value: "roost-test"Supported Values: Any valid string.Optional/Required: Optional
-
ROOST_DIRDescription: The directory path where RoostGPT files and configurations are stored.Default Value: "/var/tmp/Roost/RoostGPT"Supported Values: Any valid directory path.Optional/Required: Optional
-
LANGUAGEDescription: The programming language of the source code to be tested.Default Value: "java"Supported Values: "java", "go", "python", "csharp", "node.js"Optional/Required: Optional
-
AI_TYPEDescription: Specifies the AI model used for generating tests.Default Value: "openai"Supported Values: "openai", "vertexai", "open_source_ai", "azure_open_ai", "sagemaker_model", "claude_ai", "dbrx"Optional/Required: Optional
-
JAVA_BUILD_TOOLDescription: Specifies the java build tool for which to generate test.Default Value: "maven"Supported Values: "maven", "gradle".Optional/Required: Optional
-
PACKAGES_TO_SCANDescription: Specifies the packages to be scanned for test generation. Supports single package or comma-separated values.Supported Values: Comma-separated list of package names (e.g., "com.example.product" or "com.example.product, com.example.controller").Optional/Required: Required for Java
-
ITERATIONDescription: The number of iterations to run and improve the tests.Default Value: "1"Supported Values: Any positive integer.Optional/Required: Optional
- TIMEOUT
Description: The duration after which test generation will automatically stop.Default Value: "1 hour"Supported Values: Any valid duration string (e.g., "30 minutes", "2 hours").Optional/Required: Optional
- TEST_TYPE
Description: The type of test to generate.Default Value: "unit"Supported Values: "unit", "functional", "api-spec-test", "integration"Optional/Required: Optional
- TEST_FRAMEWORK
Description: Specifies the testing framework to be used based on the programming language and test type.Supported Values:For Python: "pytest", "unittest"For Golang: "gotest"For Java: "JUnit4", "JUnit5"For Csharp: "nunit"For Node.js: "jest", "mocha"For API spec tests or integration tests: "postman", "artillery", "rest-assured", "karate"Optional/Required: Optional
-
TRIGGER_IDDescription: Unique identifier for triggers. Used to distinguish between multiple triggers.Default Value: Epoch timestampSupported Values: Any unique string or timestamp.Optional/Required: Optional
- BOARD_TYPE
Description: Specifies the type of board to be used for tracking.Default Value: "jira"Supported Values: "jira", "azure", "none"Optional/Required: Optional
-
MAX_DEPTHDescription: Maximum depth of directories to search for test files. If set to -1, it will traverse all subdirectories.Supported Values: Any non-negative integer or -1.Optional/Required: Optional
-
FUNCTIONS_TO_TESTDescription: List of function names to be tested, specified as module.[class.]method or module.function.Supported Values: Comma-separated list of function names.Optional/Required: Optional
-
USE_CACHEDescription: Use local cache to generate test.(Only for Developers)Default Value: "false"Supported Values: "true","false".Optional/Required: Optional
-
VERIFY_TESTDescription: Indicates whether to verify if the generated tests are running correctly.Supported Values: "true", "false"Optional/Required: Optional
-
VULNERABILITY_GENDescription: Specifies whether to generate a vulnerability report based on the tests.Supported Values: "true", "false"Optional/Required: Optional
-
CONSIDER_EXISTING_TESTDescription: Used for Java, python, Golang unit test generation, It scans your repository to identify any existing tests for the specified function. If tests are found, it incorporates them into its consideration and generatesadditional test cases as needed.Default Value: "true"Supported Values: "true", "false"Optional/Required: Optional
-
GRADING_NOTESDescription:Grading notes are audit criteria used to evaluate and improve AI generated response for better accuracy and effectiveness.Default Value: "true"Supported Values: "true", "false"Optional/Required: Optional
-
CUSTOM_TAGSDescription:The tags to be attached to test code, so that the test's can run based on tagsOptional/Required: Optional
- ROOST_USER_INPUT
Description: User input to be used for generating tests.Supported Values: Any valid input string.Optional/Required: Optional
#UI Test env vars
- BROWSER_USE_HEADLESS
Description: To Open the Browser in headless mode when running UI test
Supported Values: "true","false"
Optional/Required: Optional - URLS_TO_TEST
Description: The URL for which RoostGPT need to generate playwright test
Supported Values: Any valid website url
Optional/Required: Required
# User can provide additional env var starting with "UI_" prefix like UI_LOGIN_TYPE,UI_LOGIN_EMAIL etc.
# Improve Test env vars
- FILE_PATH
Description: Location of the file containing the test if the IMPROVE_TEST variable is set to "true." This file will be used as a basis for improving the generated test.Supported Values: Any valid file path.Optional/Required: Required if IMPROVE_TEST is set to "true."
-
USER_CONTENTDescription: Content provided by the user to be used for improving the generated test. This content will be incorporated into the improvement process.Supported Values: Any valid text or data provided by the user.Optional/Required: Required if IMPROVE_TEST is set to "true."
-
TESTSCRIPT_ENDPOINTDescription: The endpoint to be improved when the TEST_TYPE is set to "postman." This specifies which API endpoint the Postman test script will target.Supported Values: Any valid API endpoint URL.Optional/Required: Required if TEST_TYPE is set to "postman."
# Language version env vars
-
JAVA_VERSIONDescription: Specifies the version of Java to be used when the TEST_FRAMEWORK is "JUnit4", "JUnit5", "karate", or "rest-assured".Default Value: "17"Optional/Required: Optional
- MAVEN_VERSION
Description: Specifies the version of Maven to be used for Java projects when the TEST_FRAMEWORK is "JUnit4", "JUnit5", "karate", or "rest-assured".
Default Value: "3.8.6"Optional/Required: Optional - GRADLE_VERSION
Description: Specifies the version of Gradle to be used for Java projects when the TEST_FRAMEWORK is "JUnit4", "JUnit5", "karate", or "rest-assured".
Default Value: "8.6"Optional/Required: Optional -
GO_VERSIONDescription: Specifies the version of Go to be used when the TEST_FRAMEWORK is "gotest".
Default Value: "1.19.9"
Supported ValuesOptional/Required: Optional - PYTHON_VERSION
Description: Specifies the version of Python to be used when the TEST_FRAMEWORK is "pytest" or "unittest".
Default Value: "3"Optional/Required: Optional -
DOTNET_VERSIONDescription: Specifies the version of .NET to be used when the TEST_FRAMEWORK is "nunit".
Default Value: "8"
Supported ValuesOptional/Required: Optional -
NODE_VERSIONDescription: Specifies the version of Node.js to be used when the TEST_FRAMEWORK is "artillery", "postman", "rest-assured", "karate", "jest", or "mocha".
Default Value: "18.18.0"Optional/Required: Optional
VS Code Extension
The Roost GPT VS code extension allows you to generate tests for your code using RoostGPT with just a click, straight from your VS Code workspace.
Download:
https://marketplace.visualstudio.com/items?itemName=RoostGPT.roostgpt
Installation:
To use the RoostGPT VS Code extension, you must have VS Code ready and installed in your system, as well as any dependencies that are required to run your code, as RoostGPT will often run its generated test code to improve it.
You can download and install VS Code for your Operating system here.
After VS Code is Successfully installed in your system, you can go ahead and download the Roost GPT VS Code extension from the VS Code marketplace, just simply search for Roost GPT in the extension store. Alternatively, you can download and install the VS code extension from here.
Once the extension is installed, you are ready to generate tests for your code.
Configuration:
Once the extension has been successfully installed in your system, you can then proceed with configuring the extension to start generating tests. This involves providing information that is required for test generation.
To configure the extension to use it, simply open the extension settings for Roost GPT, you can search for it in the extension store, or you can find it in the list of your installed extensions.
You can then set up the required values according to your workspace and needs. Following are the required fields which will be required for you to set no matter what:
Required Fields
-
Roost Token: you can get your roost token from my profile page in app.roost.ai. If you don't have a Roost token, you can sign up for a free trial and try out RoostGPT for free, using your organization email from here.
-
Roost Domain: Enter the Domain in which the provided roost token is active, the default value is app.roost.ai.
-
Timeout: Set the timeout for test generation (in hours), default value is 1.
-
Language: Select the language your workspace/source code is written in, currently supports Java, Python, Go, NodeJS, C# and C++.
-
Board Type: Select the type of scrum/kanban board, Required for functional tests. set as none other test types, supports none, jira and Azure boards. default value is none.
-
Iterations: Set the number of iterations for test generation, If you provide an iteration value greater than 0 then it will run the generated test cases and pass the error that occurred(if any) to the ai model then update the test case inside the same file and run again till the number of times of iteration and stop if it ran successfully in between. The default value is 1.
-
Telemetry: Set as False if you do not want to send telemetry data to roost. The default value is true.
-
Generative AI model: Select which model to use for test code generation, which supports OpenAI, Google Vertex, Azure Open AI, Claude AI, DeepSeek, AWS Bedrock, and DBRX Hosted Models including OpenSource Hosted Models (LLAMA2 and starchat).
- ProvideInput: Set as true if you want to provide your own input before test generation, you will be prompted for input before the test generation begins. The default value is false.
- MaxDepth: This is used to specify how deep into the workspace the extension will traverse to scan for files to generate tests for. default value is traverse to all subdirectories.
- EnvFile: This can be used to provide the path to an env file, which will provide RoostGPT with env file with user environment variables which will be taken into account in the test generation progress. You can keep this field empty.
-
AI model Details:
- If the Generative AI model is Open AI:
- OpenAI API Key: Provide your OpenAI API key if you plan on using an OpenAI as the generative AI model to generate your test cases.
- OpenAI API model: Provide the AI model the provided API key has access to, supports gpt-4o, gpt-4, gpt-3.5-turbo.
- OpenAI API Key: Provide your OpenAI API key if you plan on using an OpenAI as the generative AI model to generate your test cases.
- If the Generative AI model is Google Vertex:
- Vertex Bearer Token: Provide your vertex Bearer Token if you plan to use Google Vertex as the generative AI model to generate your test cases.
- Vertex Project ID: Provide the ID of your Google vertex project.
- Vertex Region: Enter the region where your vertex region is present
- Vertex Model: Select the Vertex model to be used for code generation; supports text-bison, code-bison, and codechat-bison. Default value is text-bison.
- Vertex Bearer Token: Provide your vertex Bearer Token if you plan to use Google Vertex as the generative AI model to generate your test cases.
- If Generative AI model is Claude AI:
- AI model: Select the AI model to be used from the dropdown menu.
- API Key: Provide your Claude AI API key.
- If the Generative AI model is Azure Open AI:
- API Key: Provide the API Key for your Azure Open AI model.
- API Endpoint: Provide the API Endpoint where your Azure Open AI model is hosted.
- Deployment Name: Enter the Deployment Name for your Azure Open AI API model.
- If the Generative AI model is Open Source:
- Open Source Model Endpoint: provide the endpoint for the open source model if you plan on using one of the roost provided open source models, you need to provide it in the format 'http://MODEL_IP:5000/generate' where MODEL_IP is the IP address for the instance where you have the model's container running.
- Open Source AI model: Select the AI model to be used for test generation, supports meta-llama/Llama-2-13b-chat, and HuggingFaceH4/starchat-beta. The default value is meta-llama/Llama-2-13b-chat.
- Open Source Model Endpoint: provide the endpoint for the open source model if you plan on using one of the roost provided open source models, you need to provide it in the format 'http://MODEL_IP:5000/generate' where MODEL_IP is the IP address for the instance where you have the model's container running.
- If the Generative AI model is Open AI:
Advanced Fields (optional):
- Optional fields are available to use the LLM effectively like
- advanced.UseAssistant can be set to True for gpt turbo models,
- AiTemperature can be set to values other than default (0.2) to control the test quality,
- VerifyTest can be set to a boolean value True. Default value is False,
- UseDocker can be set to True to generate the tests inside a docker. This will require Docker Engine server to be accessible locally.
Test Generation:
Once your extension configuration is complete, you can then start using the VS Code extension to generate tests for your workspace. To generate tests, simply right-click on a file in your Explorer menu and select the type of test you want to generate from the context menu that shows up. Note that each test type has some requirements to start test generation.
The test types currently supported are as follows:
- Unit Tests.
- API Tests.
- Functional Tests.
- Integration.
Test Requirements
Following are the Required Fields, and other instructions for test generation according to each supported test type:
-
Unit Tests: To generate Unit tests, just simply select the directory your file is present in, right-click on a file and select unit test generation, and then select the test framework you want to use from the popup. It will generate unit tests for all the files present in that file's parent directory. No extra fields other than the above-mentioned required fields are needed for unit test generation. Make sure that the language set in the extension settings matches the language your source code is in.
-
If you want the tests to be generated for only a few specified functions and not for the entire codebase, then provide the function names for which you want the tests to be generated in the FunctionsToTest input box in the advanced section of the extension settings in a comma separated fashion (e.g. Func1, Func2,...). This will ensure that tests are generated only for the specified functions.
-
For Java unit tests, please make sure to trigger the test execution from a valid module that contains a valid pom.xml, or generate tests for the entire project if pom.xml is present in the workspace folder.
- For React Unit tests, you need to use GPT-4 turbo model and set use assistant as true in the advanced section of the vs-code extension settings.
-
-
API Tests: To generate API tests, you need to right-click on Postman collection json or swagger API spec file and then select the Generate API tests. If you choose any file other than your API spec file, the test generation will fail. Then you need to select the test framework to be used for test generation (artillery, postman, or rest-assured) from the provided popup. No extra fields other than the above-mentioned required fields are needed for API Tests. For API tests, you can also filter out which HTTP verbs(such as post, get, etc.) will be tested by changing the HttpFilters setting from the advanced section. Please note that if you select postman as the test framework you will need newman cli installed in your system in order to run generated tests from the RoostGPT extension, you can install newman cli by using the command: npm install -g newman.
-
If you want to generate API tests for some specific HTTP verbs (get, post, put, patch, delete, etc.) then you can select which specific verbs need to be tested in the advanced section of the extension settings under the HTTP filters attribute.
-
If you want to generate API tests for some specific API endpoints matching a given regex pattern, you can set the regex pattern in the advanced tab of the extension settings under the HTTP endpoints for testing attribute.
- For karate and rest-assured tests, make sure that the Test generation is triggered from within a valid java/maven repo, i.e. put the api spec file in the java repo and put start the test generation from there.
-
-
Integration Tests: When generating Integration tests, you need to right-click on your Postman collection json or swagger API spec file and then select the Integration Tests option. If you choose any file other than your API spec file, the test generation will fail, after selecting the option, then need to select the test framework to be used for test generation (artillery, postman, or rest-assured), then you need to select the type of your gherkin template you can either select file and browse to your gherkin template file or you can choose URL and provide the URL to your Gherkin template. No extra fields other than the above-mentioned required fields are needed for Integration Tests. Please note that if you select Postman as the test framework you will need newman cli installed in your system to run generated tests from the RoostGPT extension, you can install newman cli by using the command: npm install -g newman. For karate and rest-assured tests, make sure that the Test generation is triggered from within a valid java/maven repo, i.e. put the api spec file in the java repo and put start the test generation from there.
- Functional tests: To generate functional tests, you need to select your board type to be either JIRA or Azure and Then the Below details are also required:
- If the Board Type is Jira:
- Jira Email.
- Jira Token.
- Jira Hostname.
- If the Board Type is Azure:
- Azure Org.
- Azure Token.
- Azure Project.
- If the Board Type is Jira:
Improve and Analyze Generated Tests
After the test generation process is complete, a side panel will open, showing you all the generated test files, you can select the file you want to view by using the dropdown provided, if you want you can also edit the files in the panel itself and save your changes using the provided save button.
If you want to run the generated tests, you can do so from the provided run button in the side panel, doing so will run the selected test file. NOTE that you will need to have all the dependencies required for running the tests installed in your local system for test generation to take place. and for artillery tests, after you click the run button, you will be prompted to enter the target URL for the tests, if you want to provide a target URL, please provide so in the input box, and then you will be asked if you want to upload a .env file to provide environment variables, if yes then you can upload the env file for the same.
If you are not satisfied with the generated tests and want some improvements or changes in the test, then at the bottom of the side panel, you will find a feedback prompt, enter the feedback prompt that you want to give to the AI model and then click the improve button, this will trigger the test improvement.
RoostGPT Infrastructure
This section details the RoostGPT resources required
RoostGPT Resources for Whitelisting
Terraform Resources Provisioned in AWS
| Resource Name |
Description |
| aws_key_pair |
AWS EC2 keypair to SSH |
| aws_eip |
An elastic ip to be used by NAT Gateway for public subnet |
| aws_ami |
Ubuntu based AMI id - region specific |
| aws_vpc |
VPC |
| aws_availability_zones |
AZ preferred |
| aws_internet_gateway |
IG for VPC to communicate with internet e.g. apt update |
| aws_subnet |
private and public subnets |
| aws_security_group |
SG for bastion, backend and frontend service of RoostGPT |
| aws_lb_target_group |
Target group for loadbalancer |
| aws_route_table |
Route Table entries for inbound and outbound traffic |
| aws_instance |
Instances to deploy RoostGPT frontend and backend services |
| aws_route_table_association |
To allow network traffic for instance to instance communication |
| null_resource |
To deploy and run RoostGPT installer scripts on instance |
Docker Images (hub.docker.com)
| Image Name | Tag |
| zbio/roostai_mysql_db | v1.1.17 |
| zbio/roost-nginx | latest |
| zbio/roost-app | v1.1.17 |
| zbio/roostai-server | v1.1.17 |
| zbio/roostgpt-go | v1.1.17 |
| zbio/roostgpt | v1.1.17 |
| zbio/roostgpt-ui | v1.1.17 |
| zbio/roost-proxy | v1.1.17 |
RoostGPT scripts or executables from
https://github.com/roost-io/roost-support/releases/tag/v1.1.17
| Name | Purpose |
| roost.sh | Deployment script for Hosted stack |
| roost-enterprise.sh | Controller script for Hosted stack |
| main-config.json | Configuration Template for Hosted stack |
| aiServer.sh | Internal scripts for Hosted stack |
| aiServer.gz | Internal daemon executable for Hosted stack |
| releaseServer.sh | Internal scripts for Hosted stack |
| releaseServer.gz | Internal daemon executable for Hosted stack |
| roost.sql | SQL template for Database (Hosted stack) |
| roostcertgen.gz | Self signed certificate generation (Hosted stack) |
|
Installer for On-Prem, single Ubuntu server hosted stack
|
|
| roostgpt-1.0.15.vsix | VS Code Plugin |
RoostGPT Database for Hosted Server
RoostGPT solution requires a RDBMS to
- Store test configurations
- RoostGPT connector information
- User and Team information
For POC or limited trials, RoostGPT can also use a containerised database. However, it has limitations related to
- Enterprise-grade reliability and security
- Advanced feature set and integrations
- Professional support and SLA guarantees
- Automated maintenance and updates