Self Hosted RoostGPT - Deploy on AWS using Terraform
To self-host RoostGPT stack, we need the below infrastructure resources.
- MySQL or Postgres Database
- SSL Certificates and a DNS domain
- oAuth application related client id, secret and DNS configuration for redirect
- Identify an IP CIDR range and a cloud data-center region and availability zone for configuring cloud compute and networking resources
The below resources will be provisioned using Terraform script
- VPC and corresponding public and private subnets and NAT gateway
- Ubuntu Compute instances (EC2) and associated storage volumes
- Application Load-balancer and target groups
- 1. Getting Started
- 2. OAuth Provider Setup
- 3. Database Setup
- 4. Terraform variables
- 5. Upgrading/Maintaining RoostGPT Control-plane
1. Getting Started
Roost provides terraform scripts to spin up and configure the RoostGPT platform easily. Below are the steps for deploying Roost on AWS using Terraform
High-Level Architecture
Roost Terraform scripts create the below components in the AWS cloud
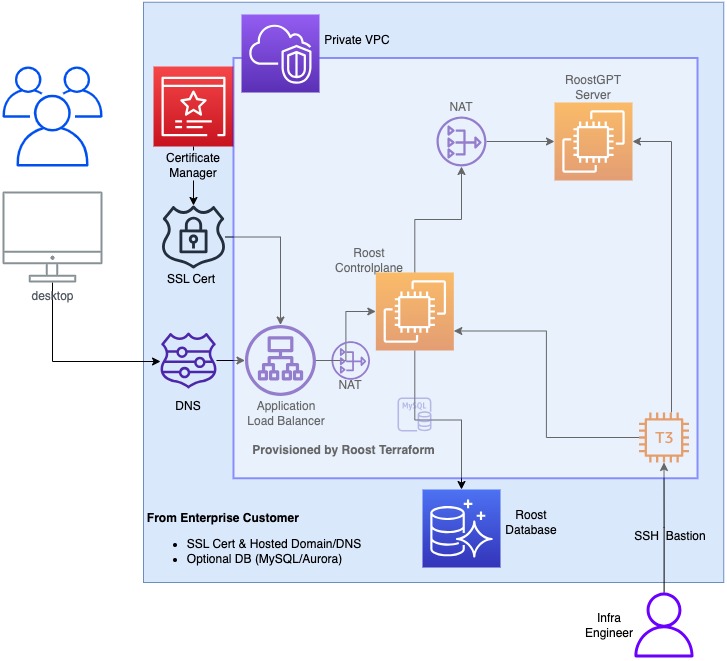
Interactive diagram at https://docs.roost.ai/arch
Prerequisites
- User Account with Admin privileges / Policies enabled to run terraform scripts
- region
- route53_hosted_zone_id
- ec2_ami (for Ubuntu Jammy 22.04)
- enterprise_dns
- ip_block_vpc (VPC CIDR where Roost would be set up)
- okta_client_id or appropriate auth provider ( please refer next section)
- company name
Download the Terraform scripts
curl -LO https://github.com/roost-io/roost-support/raw/refs/heads/master/terraform-ec2.zip2. OAuth Provider Setup
Roost supports various authentication mechanisms as mentioned below
- Okta
- Microsoft Azure ADFS
OKTA Auth Client Setup
- Sign in to your OKTA account with admin privileges (If you do not have an existing Okta account, then sign-up at Home | Okta Developer )
- From the left navigation menu, go to Applications -> Applications.
- Select Create App Integration → OIDC - OpenID Connect → Web Application, then click Next
- Fill in the suitable App integration name, upload the logo.
- Add Sign-in redirect URIs
- https://<DNS_NAME>/login
- Allow Access to users thru Assignments → Controlled Access
- Select the groups of users or Allow access to everyone
- Save and Make a note of the Okta Client ID and the Client Secret (It is needed later in the config below)
- From the left navigation menu, go to Security -> API
- Make a note of Issuer URI for default Authorisation Server
- something like https://{your_domain}.okta.com/oauth2/default
Google Auth Client Setup
-
Integrating Google Sign-In into your web app | Google Sign-In for Websites | Google Developers
-
Create Credentials, Select OAuth Client and Application Type as Web Application
-
Add Authorised JavaScript Origin as
-
https://<DNS_NAME>
-
-
Add Authorised redirect URIs
-
https://<DNS_NAME>/login
-
https://<DNS_NAME>/api/auth/redirect/google
-
-
Download the JSON
-
Make a note of the Google Client ID and the Client Secret (It is needed later in the config below)
Azure ADFS Auth Client Setup
Roost 0Auth2 Setup - Windows Server 2016/2019 - ADFS 4.0
-
Open the Server Manager from Start Menu, Select Tools > AD FS Management
-
From the AD FS Management screen, go to AD FS ➜ Application Groups
-
Click Add Application Group on right panel
-
Fill in a name (Roost) for the application group
-
Select Server Application Web browser accessing a web API and click Next
-
Make note of the Client Identifier value. This will be the value for the
AZURE_ADFS_CLIENT_IDvariable -
Fill the Redirect URI (https://<DNS_NAME>/login ) and click Add, then Next
-
Check the Genrate a shared secret box
-
Use the Copy to clipboard button to retrieve the secret. This will be the value for the
AZURE_ADFS_CLIENT_SECRETvariable. Click Next -
Enter the Web API identifier (Same as RedirectUri - https://<DNS_NAME>/login ) and click Add, then Next
-
On the Access Control Policy screen, select a policy, usually Permit everyone and click Next
-
On the Configure Application Permissions screen, select the scope openid and click Next
-
Review the settings and click Next
-
Close the wizard by clicking Close. Our application is now registered in ADFS.
-
Now, we need to Configure the Claims for Application
-
Open the Properties for the application group we just created.
-
Select the Web application entry (Roost - Web API) and click Edit
-
On the Issuance Transform Rules tab, click the Add Rule button
-
Select Send LDAP Attributes as Claims and click Next
-
Give the rule a name (Roost Claims) and select Active Directory as the attribute store.
-
Now configure the below claims (LDAP Attribute => Outgoing Claim Type):
-
E-Mail-Addresses => E-Mail Address
-
Given-Name => Given Name
-
Surname => Surname
-
SAM-Account-Name => Windows Account Name
-
User-Principal-Name => UPN
-
Click Finish to save the claims
-
You should now see the rule added. Click OK a couple of times to save the settings.
-
Now the setup is complete. We set these 3 values as environment variables:
-
AZURE_ADFS_CLIENT_ISSUER- Domain of ADFS Server (https://adfs.contoso.com) -
AZURE_ADFS_CLIENT_ID- Client Identifier of server application -
AZURE_ADFS_CLIENT_SECRET- Client Secret we copied to clipboard
If don’t want to use Client Secret, then Add an Native Application and pass AZURE_ADFS_CLIENT_SECRET variable as empty
3. Database Setup
Roost stores the status of the GPT workflow and other relevant information in Database. Roost supports MySQL, Postgres and Amazon Aurora DB. Any one database is needed for RoostGPT to work.
Below are the steps to setup an RDS in AWS
Amazon Aurora (MySQL Compatible) OR MySQL
-
Select RDS
-
Choose Create Database
-
Select “Easy Create” for “Amazon Aurora with MYSQL compatibility" or "MySQL"
-
Modify the RDS Security Group to allow TCP port 3306 access to the Control plane Instance security group only
-
Make a note of the writer instance database end-point, user, and password (It is needed later in the config below)
Create a new user with read-write privileges and avoid using an admin login.
# Sample command to create a user using MySQL CLI
# Provide password on prompt

mysql -h <SQL Host URL> -u <root|master|admin> -p
CREATE USER 'Roost'@'%' identified WITH mysql_native_password by 'Roost#123';
CREATE DATABASE roostio;
GRANT ALL on roostio.* to 'Roost'@'%';
# Execute the Roost Schema file, if available
\. /var/tmp/Roost/db/roost.sql
Amazon Aurora (PostgreSQL Compatible) OR PostgreSQL
-
Select RDS
-
Choose Create Database
-
Select “Easy Create” for “Amazon Aurora with PostgreSQL compatibility" or "PostgreSQL"
-
Modify the RDS Security Group to allow TCP port 5432 access to the Control plane Instance security group only
-
Make a note of the writer instance database end-point, user, and password (It is needed later in the config below)
-
Create a new user with read-write privileges and avoid using an admin login.
psql "host=<PG Host URL> user=<admin> dbname=postgres port=5432 sslmode=require"
CREATE DATABASE roostio;                                  -- creates app database [5]
CREATE USER roost WITH PASSWORD 'Roost#123';              -- creates login role [3]
GRANT ALL PRIVILEGES ON DATABASE roostio TO roost;        -- DB-level grant [4]

-- Connect to the new DB (reconnect as admin or roost), then set schema privileges
\c roostio
GRANT USAGE ON SCHEMA public TO roost;
GRANT ALL ON ALL TABLES IN SCHEMA public TO roost;
GRANT USAGE ON ALL SEQUENCES IN SCHEMA public TO roost;
ALTER DEFAULT PRIVILEGES IN SCHEMA public
  GRANT ALL ON TABLES TO roost;
ALTER DEFAULT PRIVILEGES IN SCHEMA public
  GRANT USAGE ON SEQUENCES TO roost;

-- Execute the Roost Schema file, if available
\i /var/tmp/Roost/db/roost.sql
4. Terraform variables
Please follow the below steps to modify terraform files to incorporate the
- Copy
terraform.tfvars.originalasterraform.tfvars - Fill in the below details (sample values are already provided)
enterprise_dns = "subdomain.domain.com"
admin_email = "comma separated list of emails"
enterprise_email_domain = "email-domain.com"
company = ""
license_key = ""
roost_jwt_token = "32-character-secure-long-secret"
roost_version = "v1.1.17"

az1_suffix = "b"
az2_suffix = "c"
certificate_arn = "arn:aws:acm:region:account:certificate/cert-id"
ec2_ami = "ami-023a307f3d27ea427"
region = "region"
ip_block_vpc="172.32.255.192"
route53_hosted_zone_id = ""
key_pair = "roost-ssh"

azure_tenant_id = ""
azure_client_id = ""
azure_client_secret = ""
okta_client_id = "your client id"
okta_client_secret = "your client secret"
okta_issuer = "https://account.okta.com/oauth2/default"

is_own_mysql = false
mysql_db_name = "roostio"
mysql_host = "mysqldb_host_url"
mysql_password = "Roost#123"
mysql_port = 3306
mysql_root_password = "Admin#123"
mysql_username = "Roost"
Terraform Variable Definitions
|
Field |
Values | Description |
| roost_version | "v1.1.17" | |
| license_key | ||
| prefix | "terraform-gpt" | |
| region | "us-west-1" | |
| az1_suffix | "b" | |
| az2_suffix | "c" | |
| deletion_protection | false | |
| route53_hosted_zone_id | ||
| enterprise_dns | "roostgpt.example.com" | |
| enterprise_ssl_certificate_path | "/var/tmp/Roost/certs/server.cer" | |
| enterprise_ssl_certificate_key_path | "/var/tmp/Roost/certs/server.key" | |
| certificate_arn | "" | |
| ec2_ami | "ami-03df6dea56f8aa618" | |
| key_pair | "roost-gpt-keypair" | |
| generate_key_pair | true | |
| device_name | "sdh" | |
| ip_block_vpc | "172.32.255.192" | |
| instance_type_controlplane | "c5a.2xlarge" | |
| instance_type_jumphost | "t3.micro" | |
| disk_roostgpt | 150 | |
| disk_jumphost | 150 | |
| disk_controlplane | 150 | |
| google_client_id | ||
| google_client_secret | ||
| github_client_id | ||
| github_client_secret | ||
| linkedin_client_id | ||
| linkedin_client_secret | ||
| azure_tenant_id | ||
| azure_client_id | ||
| azure_client_secret | ||
| okta_client_id | "0oa4bweaxcqn2sfTu5d7" | |
| okta_client_secret | "D5oRtWXUWcl9gp1312dVtuSoumU4vrECO4wSsqAO" | |
| okta_issuer | ||
| roost_jwt_token | ||
| company | ||
| company_logo | "https://roost.ai/hubfs/logos/Roost.ai-logo-gold.svg" | |
| enterprise_email_domain | "example.com" | |
| admin_email | "admin@email" | |
| admin_email_pass | "" | |
| senders_email | "sender@email" | |
| is_own_mysql | false | |
| db_type | "mysql" | |
| mysql_host | "mysqldb_host_url" | |
| mysql_password | "Roost#123" | |
| mysql_username | "Roost" | |
| mysql_port | 3306 | |
| mysql_db_name | "roostio" | |
| mysql_root_password | "Admin#123" | |
| senders_email_pass | ||
| email_smtp_host |
5. Upgrading/Maintaining RoostGPT Control-plane
There are multiple options available to refresh or upgrade the RoostGPT stack. The infrastructure engineer can use either of these approaches.
a. Using Terraform Script to upgrade RoostGPT version
Update Terraform Variables in "terraform.tfvars" to reflect the appropriate Roost Version
|
Field |
Values |
|
roost_version |
v1.1.17 |
Run below commands:
terraform applyb. Using Terraform Script to refresh control-plane (without any config change)
Run below commands
terraform apply --replace="null_resource.provision-controlplane-system" --replace="null_resource.provision-roostgpt-server" --replace="null_resource.run-controlplane-services"c. Using SSH to control-plane instance
RoostGPT control-plane runs a docker compose script and the entire offering can be updated using the below given steps.
- SSH Connect to your infrastructure bastion instance as ubuntu user
- Execute the below snippet with the appropriate Roost Version (after replacing v1.1.17)
ssh cp "ROOST_VER='v1.1.17' /var/tmp/Roost/bin/roost-enterprise.sh -c /var/tmp/Roost/config.json -i roostai"